A few months ago I bought a Novation FLKey to use as a MIDI controller for several devices which aren’t connected to a DAW.
Of course, it later turned out that due to a combination of subtle quirks or missing features in other equipment, the planned setup wouldn’t be possible without purchasing yet more equipment, or just using a DAW. However, as I use Ableton, I suddenly found myself needing to use a controller designed for use with a FruityLoops workflow with Ableton instead 1.
Although Ableton allows custom MIDI mappings, and the controller itself allows pots and pads to be remapped using Novation’s Components software, when looking at the Launchkey and FLKey controllers online I started to wonder about just how different they actually were.
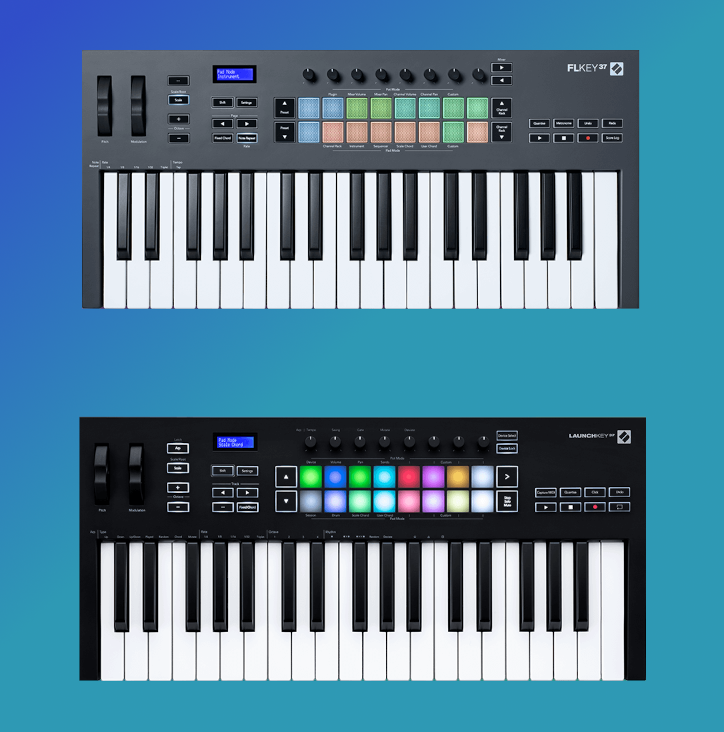
Given that their price was the same, and they were almost visually identical, surely the extent of the FLKey and LaunchKey differences were some silk screens, the colour of the plastic housing, and a slightly different firmware build?
If this was true, perhaps I was just a firmware update away from “out of the box” first class Ableton support?
Naturally, the first point of call was to understand where to get the firmware updates, how firmware updates were installed, and then whether it was possible to just … download and flash the Launchkey firmware onto the FLKey without any additional messing around.
Of course, nothing is ever that simple.
Components and Web MIDI
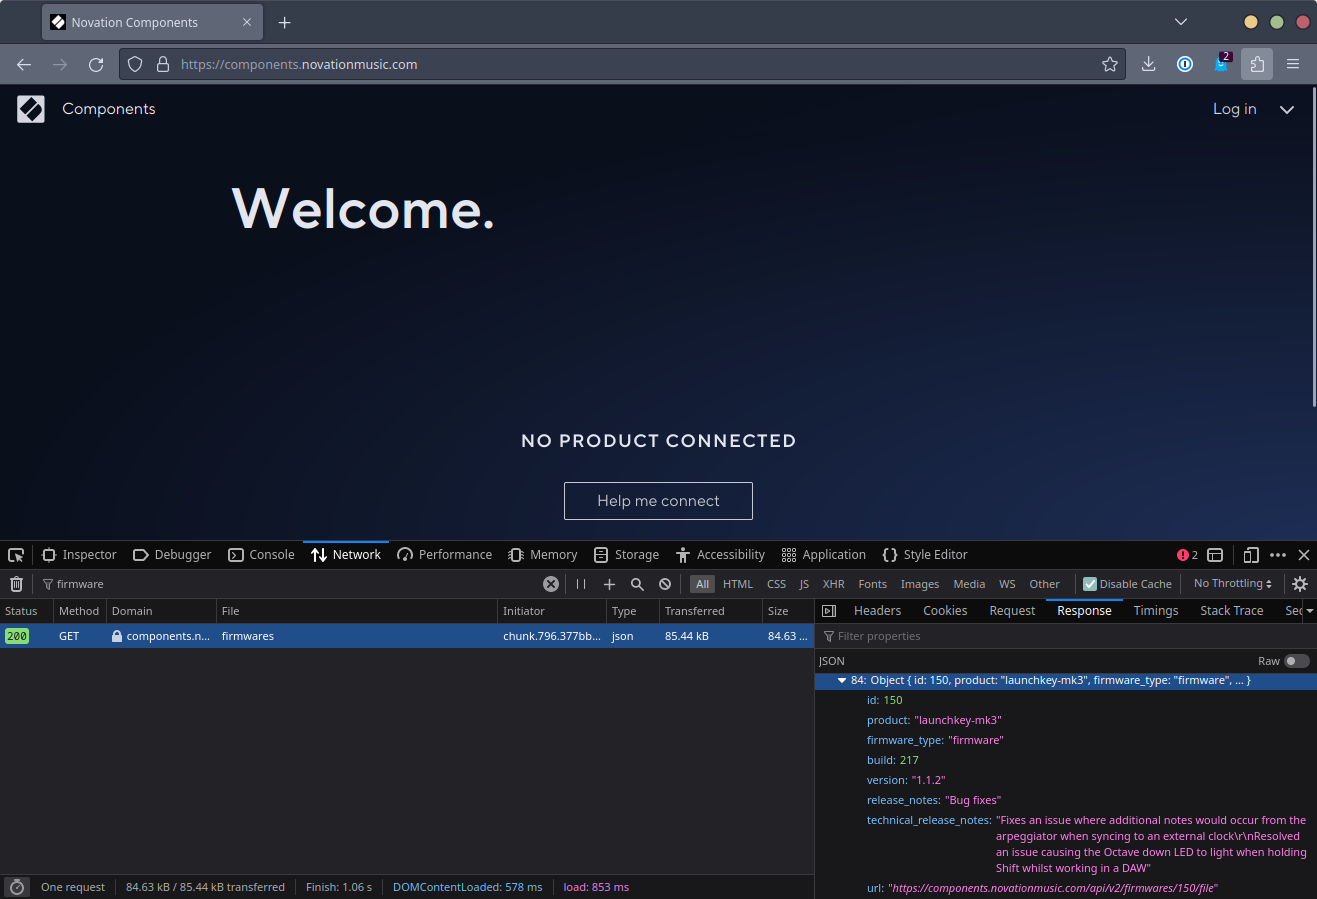
After reading the documentation, it appeared that both firmware updates and configuration of the FLKey was performed using a Novation web application called “Components”. This web application could be used with several other Novation devices to allow in-browser configuration, management, and update using Web MIDI.
Interestingly, when this application was loaded, even without a controller connected, an API call was made which returned a list of available firmware updates for all supported controllers. This was convenient as the firmware for a given product was just an HTTP GET call away; no authentication or additional ceremony needed.
The question at this point was how these updates were applied to the controller from the browser. Given Web MIDI was used by the rest of the application, and no additional drivers or companion applications were required, it seemed likely that the updates were also performed over MIDI.
However, rather than try and wrangle a minified Javascript application to understand the update process, it seemed more appropriate to instead download a few firmware updates and dig through them to try and determine their format.
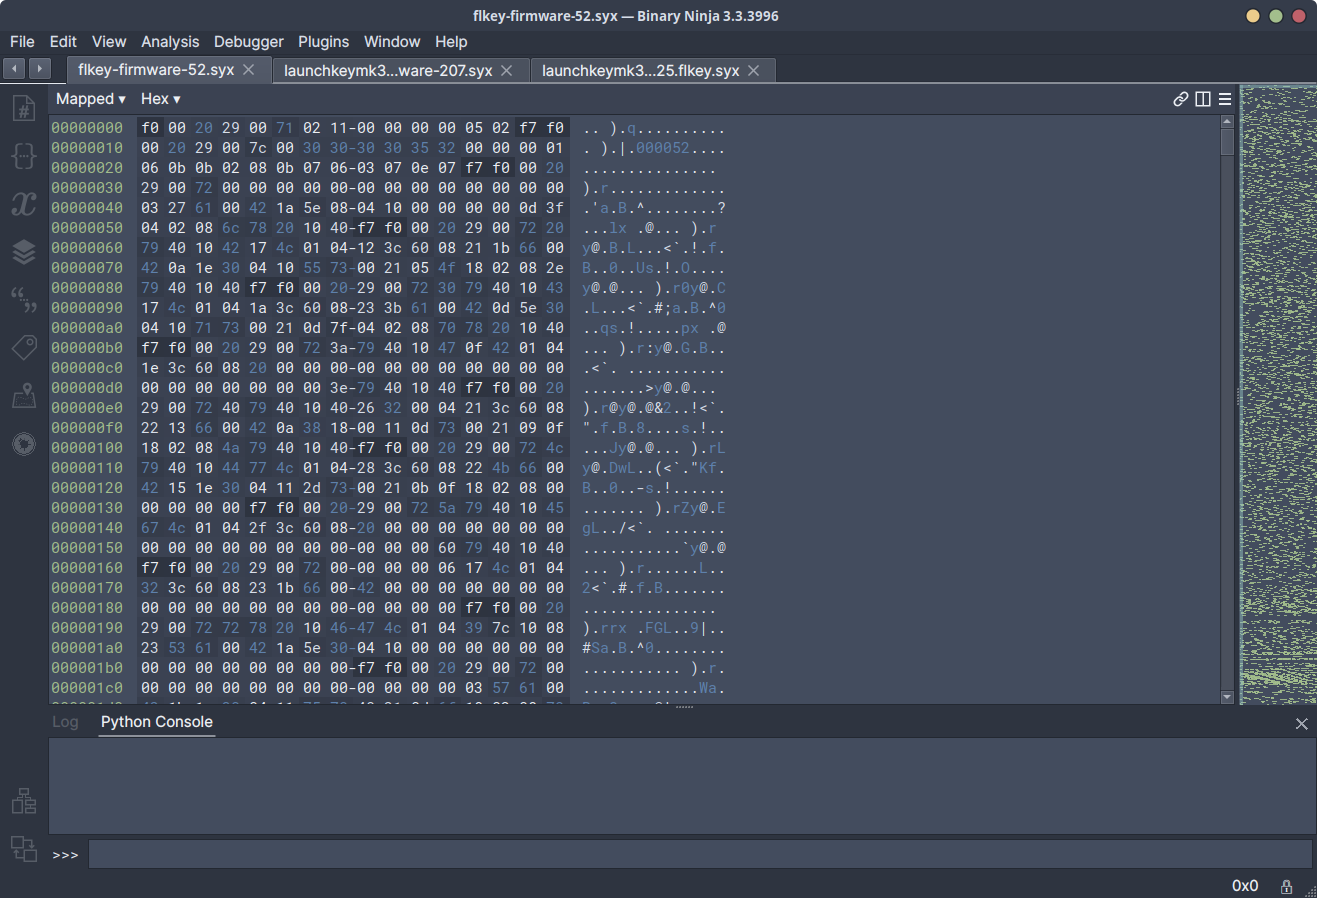
After opening a handful of downloaded update files in Binary Ninja, it was
quickly apparent that the update appeared to be made up of a series of variable
sized chunks, with each chunk beginning with 0xF0, and ending with 0xF7.
Some quick Googling indicated that this structure matched what would be expected
to be found inside of a file containing MIDI SysEx (System Exclusive) messages.
Given this, it seemed likely that this update could potentially be applied to
a connected device using a command-line tool like amidi; rather than using
the “Components” application. If this was possible, could the latest Launchkey
firmware also be flashed directly over an FLKey?
To find out, the FLKey first needed to be booted into the bootloader.
Bootloader
By holding down the “Octave +” and “Octave -“ buttons on the FLKey when applying power, the FLKey would enter its bootloader.
The FLKey bootloader provided information about the loaded “application” version, as well as a detailing that there was a separate “bootloader” version. As these were listed separately, it seemed likely that bootloader updates were able to be flashed separately to the main application; likely done to allow a firmware update to fail without bricking the device. This was good news, as it meant there was potentially a way to recover the device if “bricked” during attempts to load the Launchkey firmware.
The first point of call was to see whether the Launchkey firmware downloaded
from “Components” could be flashed directly onto the FLKey using amidi with
no additional effort. In order to confirm this, the following command was run
from a Linux machine with the FLKey connected (in bootloader mode).
amidi -d -p hw:2,0,0 -i 50 -s ~/launchkey-mk3-207.syx
…However, the FLKey did not seem to react at all when trying this. The
complete lack of reaction from the FLKey hinted that the firmware was either
not being sent correctly, or the FLKey was immediately rejecting the update. In
order to check whether the issue was related to not sending the update in a way
that the FLKey was expecting, a copy of the latest FLKey firmware was attempted
to be sent to the connected FLKey using amidi in the same way.
When calling the amidi command using the FLKey firmware update file, the FLKey
immediately started to display an animation across the pads - indicating that
the update was being transferred to the unit. This confirmed that previously the
FLKey was likely rejecting the Launchkey firmware - and quickly, too.
Given how quickly the FLKey rejected the previously attempted Launchkey firmware, it seemed likely that something at the beginning of the firmware update was being used to determine that the Launchkey firmware was not valid for the device.
As a result, it was time to look at the contents of the updates and try and work out how the FLKey was able to reject the “incorrect” update so quickly.
Firmware updates
Before digging into the firmware updates, it seemed appropriate to become more familiar with SysEx. Luckily, there is a significant amount of information available online about MIDI and SysEx; including the original MIDI specification, and detailed implementation specific information from vendors like Fractal Audio.
However, according to the “Standard MIDI Files 1.0” section of “The Complete MIDI 1.0 Detailed Specification (v96.1)” 2 there did not appear to be any standard specification for how data is structured inside of SysEx messages. It appeared that the implementation details related to SysEx was entirely up to the vendor to decide. Fun.
As a result, both the firmware running on the FLKey and the firmware updates previously downloaded from “Components” were likely the best source of information about how Novation had designed their firmware update process.
By comparing a set of previously downloaded firmware updates for the FLKey and Launchkey with a hex editor, a set of common patterns emerged relating to both the structure of the updates, as well as the potential purpose of a number of fields within the SysEx messages. These patterns identified that there appeared to be several different message types within an update, differentiated only by their payload and the two bytes proceeding. Given their location, these two proceeding bytes were determined to likely indicate the type of the message which followed (herein referred to as a “command”).
Although the overall size of different message types was variable, the following structure was found to be consistent across all commands within an update.
0xF0           - SysEx Start of Message (SOX)
0x00 0x20 0x29 - Novation Manufacturer ID [0x20 0x29]
0x00 0x71      - Command
[...]          - Payload
0xF7           - SysEx End of Message (EOX)
Only a handful of commands were observed in the analysed firmware updates. These commands were tentatively labelled as follows; based on both their position in the update file, as well as any their contents.
0x00 0x71 - START
0x00 0x7C - METADATA
0x00 0x72 - DATA
0x00 0x73 - END
During the comparison of two versions of Launchkey firmware against the only
published FLKey firmware, the structure of the first command in a firmware
update (START) was sketched out. Based on the first 2-bytes of this START
command matching across multiple versions of firmware for the same device, it
was believed that these 2-bytes likely contained manufacturer and model
identifiers. For the given device, these values were found to be as a follows.
0x02 0x0F - Launchkey MK3
0x02 0x11 - FLKey
As a full example, the overall structure of a START command (0x00 0x71) from
a Novation (0x02) Launchkey (0x0F) update was able to be roughly sketched
into the following struct.

Given these identifiers were so close to the start of the update, it seemed
possible that the FLKey bootloader was using these fields to determine whether
a firmware update was the correct update for the device, and if not, ignore it
entirely. In order to confirm whether this was the case, a copy of the original
Launchkey firmware was modified with the value of the manufacturer and model
fields set to the values taken from an FLKey update (0x02 0x11). This newly
patched firmware update was then sent to the FLKey using the same amidi
commands used previously.
Almost immediately, the FLKey began to accept this patched Launchkey update; displaying the same pad animation as it did when receiving a valid FLKey update. Unfortunately, as soon as the update had finished sending, the FLKey rebooted and displayed no signs of life. No lights. No display. Nothing. In a word: Fucked.
Luckily, due to good design decisions by Novation, the bootloader had been left untouched by this update process. Only the application image had been replaced. This allowed the FLKey to be once again booted into the bootloader, and the patched franken-firmware replaced with the an original unmodified FLKey update.
After this update had complete, the FLKey rebooted and was operational once again. Phew.
Where to next?
As the easy approach didn’t work, from here there were a few options available:
- Attempt to determine the firmware update encoding from the SysEx files.
- Look for a non-invasive way of dumping the firmware from the device to reverse.
Rather than try and brute-force the firmware encoding from a sea of possible encoding schemes, popping the case on the FLKey to look for debug ports and test points was determined to be the best way forward. The ideal state would be a way to dump the firmware from the device; allowing a pathway towards understanding how firmware updates were encoded, and why the FLKey bootloader was unable to boot the Launchkey firmware.
Internals
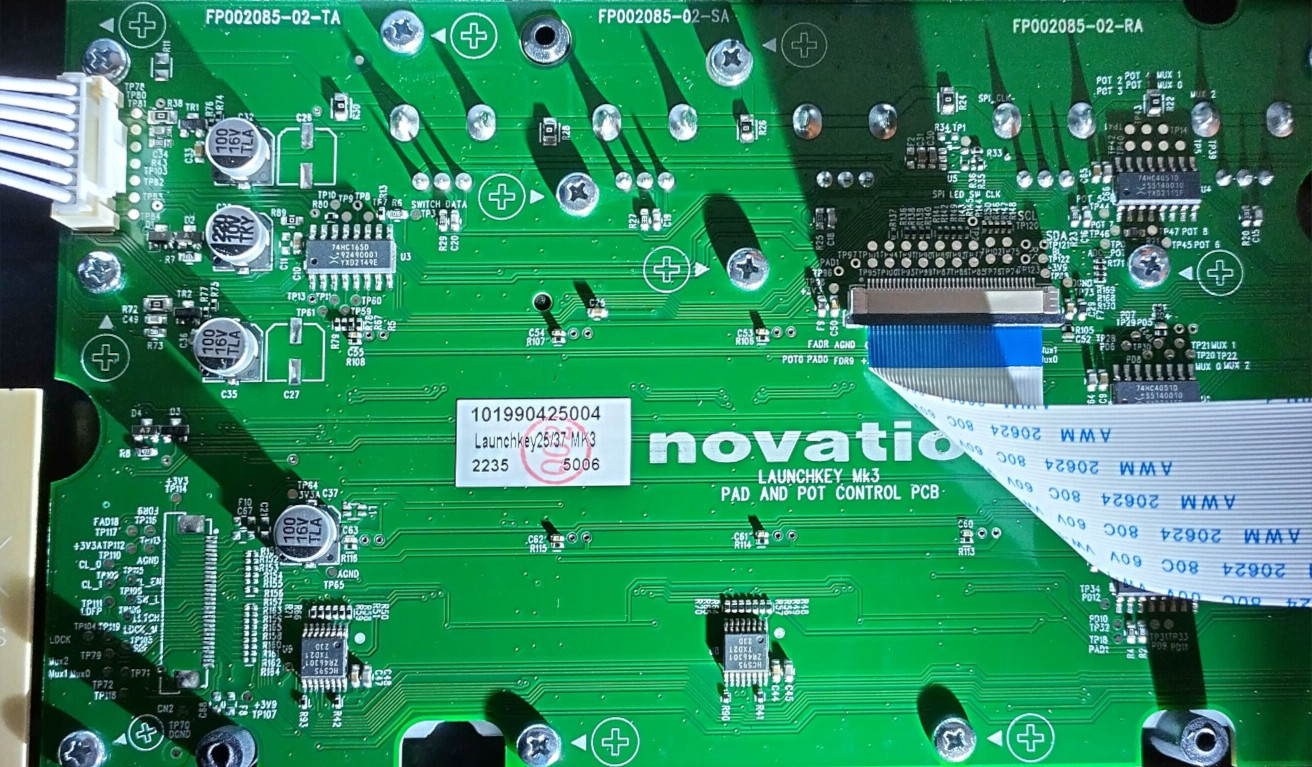
When disassembling the FLKey there were two immediately interesting features which stood out. The first was that the several PCBs inside the FLKey had a labels and silkscreens indicating that the board were originally designed for Launchkey series devices. The second was that the “compute” board had a tag connect footprint for a debug interface (!).
Unfortunately, the FLKey had a 10-pin tag connect footprint, which meant either buying a new tag connect adapter, or not using tag connect.
As the traces between the STM32 and J1 were short, were not connected to any other test points, and used tented vias, it was deemed easier to just order an appropriate tag connect adapter. Although it would have been possible to solder directly to the tag connect pads, or use a fibreglass pencil to remove solder mask from the adjacent vias to solder onto, having a 10-pin tag connector adapter on hand for future seemed like a far better better and less fiddly idea.
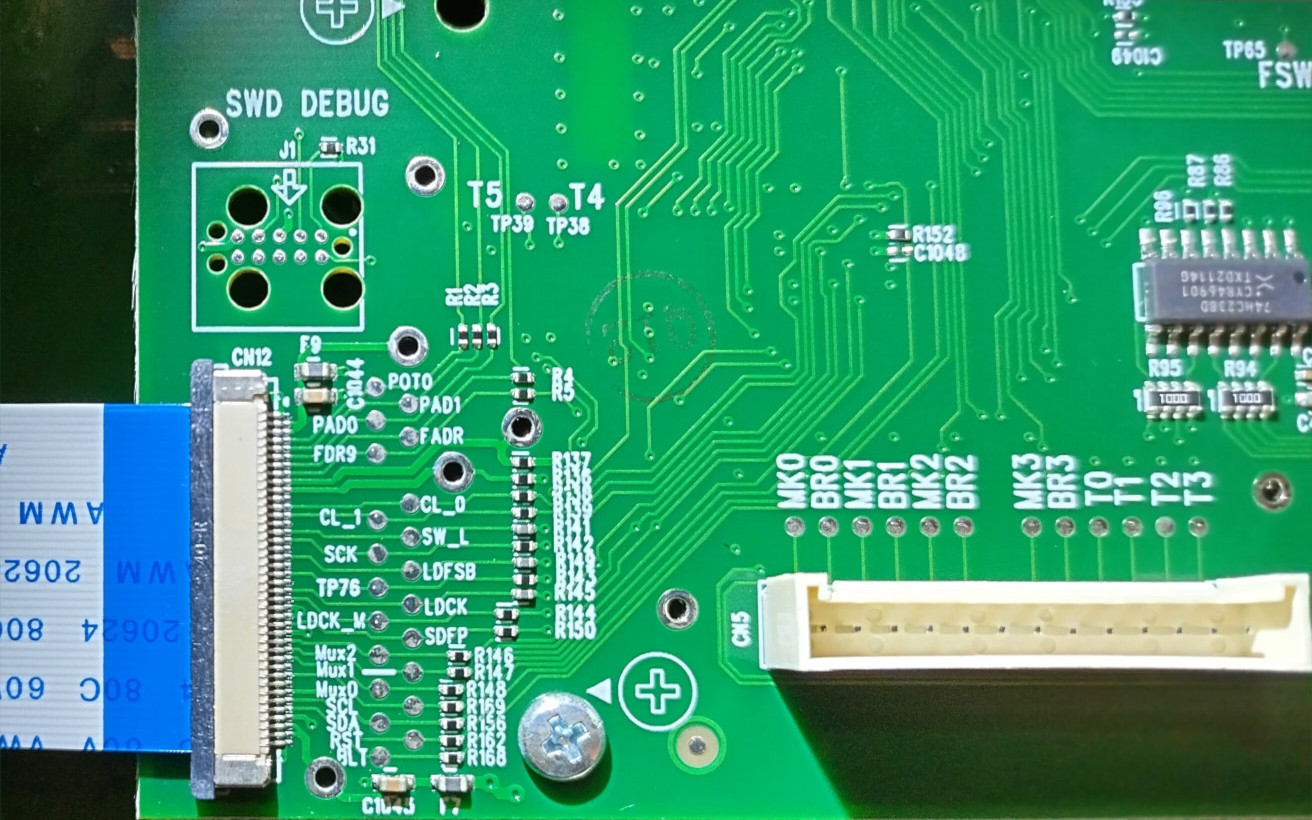
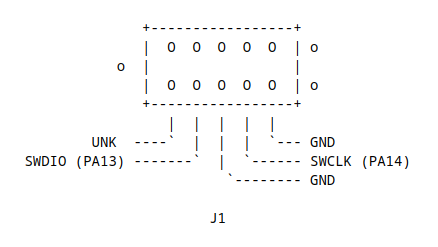
While waiting for an appropriate tag connect adapter to arrive, the J1 (“SWD DEBUG”) footprint was pinned out using a multi meter set to continuity mode. Using the pinout in the STM32F401 (LQFP64) data sheet 3, it was possible to determine the pin-out of this debug interface, which was as follows.
Of course, this may have been all for naught if Novation had shipped the FLKey with Read Out Protection (RDP) enabled. This feature, if enabled, would have prevented using a debugger to read out the firmware (level 1), or even prevented attaching a debugger in the first place (level 2) 4. However, it’s worth noting that these features are not infallible and can, occasionally, be bypassed with varying levels of effort 5, 6.
As J1 had been pinned-out back to STM32, the behaviour of the STM32 when attempting to connect a debugger could inform what RDP level was in use.
- If a debugger could not connect, the STM32 was likely in RDP level 2.
- If a debugger connected but flash could not be read, the STM32 would be RDP level 1.
- If a debugger connected and flash could be read, the STM32 would be RDP level 0.
Dumping the firmware
After the tag connect cable arrived, it was confirmed that the STM32 was in RDP level 0 - that is to say, there were no restrictions.

As a debugger had been successfully connected to the STM32, the first point of call was to dump the flash. This would both serve as a “rip-cord”, allowing a way to recover the device in the case that future attempts to load the Launchkey firmware killed the boot loader, as well as allowing static analysis of the firmware to reverse engineer the update process.
To perform this firmware dump the OpenOCD flash read_bank commands were used -
allowing the entire contents of the STM32 flash to be witten to file on the
machine hosting OpenOCD. The result of this process was a nice and shiny 256KiB
file containing both the application image and the bootloader for the FLKey.
Next up, analysis!
Finding North
In order to find out how the firmware updates were encoded, and why the FLKey bootloader was refusing to boot the Launchkey update, the newly dumped firmware would need to be analysed. Firstly, however, the address that the firmware was loaded at in memory as well as the start address would need to be identified.
As the FLKey is based on the STM32F401 it seemed likely that firmware was loaded
at 0x8000000 (the default). If not, then the configured address could be read
out of the BOOT_ADD0 option bytes.
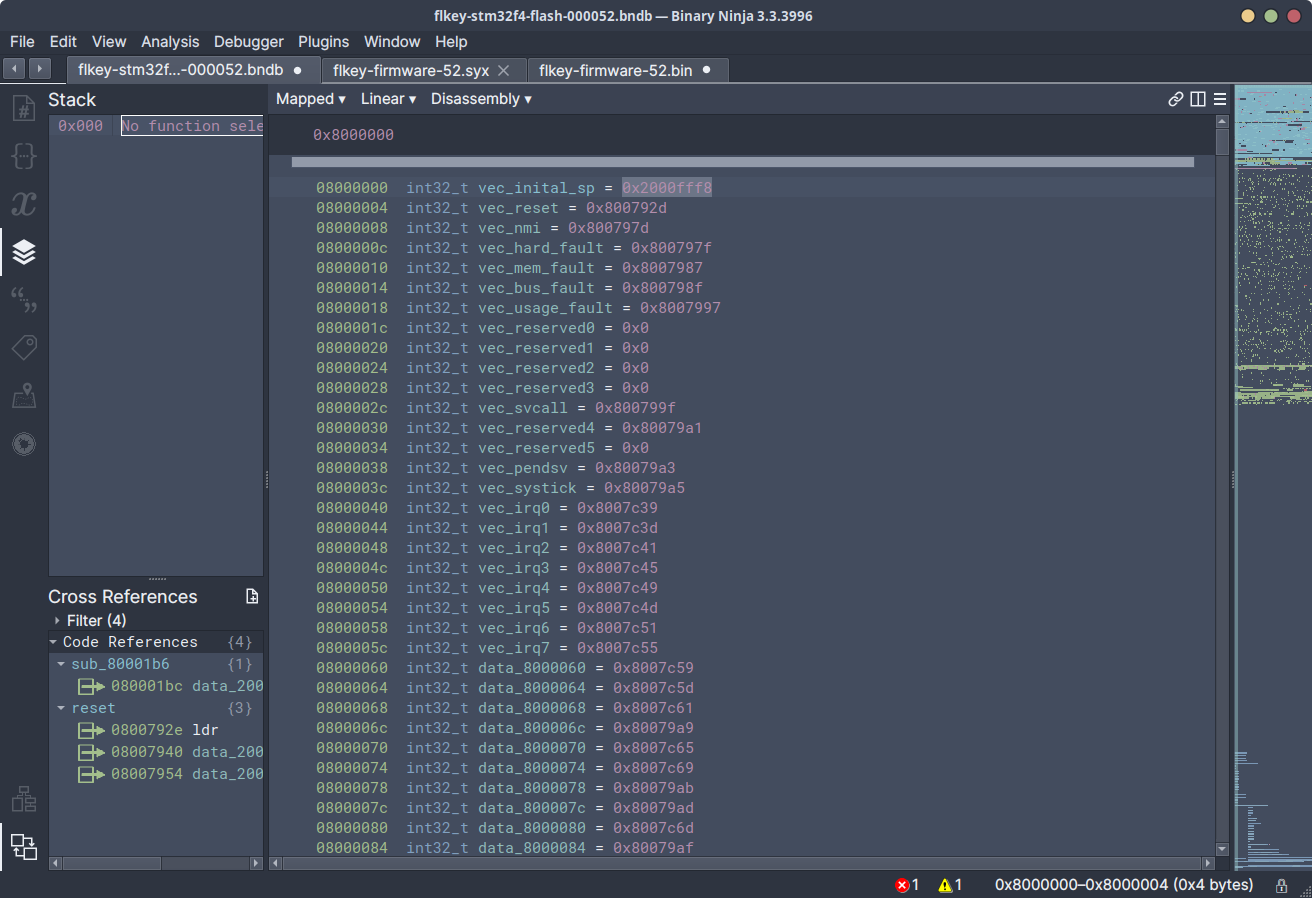
In terms of start address, this was able to be identified using the value of the
4-byte reset vector at the beginning of the dumped firmware. This is easily
identifiable due to the well known and well documented structure of the
Cortex-M4 vector table 7.
Once these values were known, the dumped firmware could be loaded into Binary Ninja, an appropriate CMSIS-SVD8 file loaded to assist with identification of peripherals, and auto-analysis kicked off at the correct address.
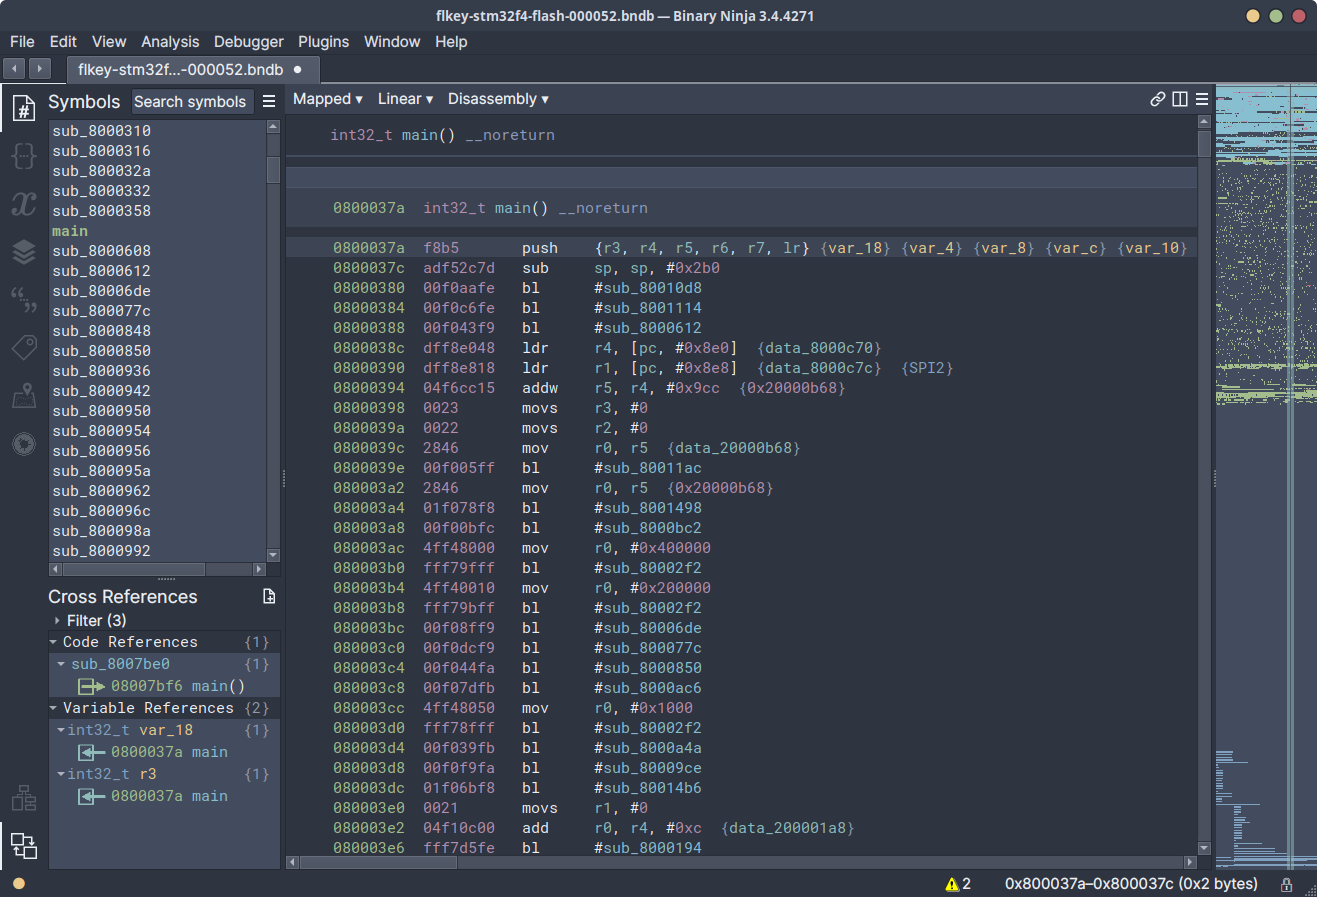
Poking through the function at reset (0x800792d), the main (0x0800037a)
function was able to be located by identifying the bring-up code in reset -
responsible for setting up clocks, peripherals, interrupts, floating point
extensions, etc - and following the next branch.
Although it would be possible to painstakingly follow every branch and attempt
to decipher what was going on, branching out from main in a linear fashion,
it was much easier to use the tools at available to speed things up. By
attaching a debugger using the same interface used to dump the firmware, it was
possible to greatly speed up the process of finding relevant “interesting”
sections. Starting with where the patched Launchkey firmware was failing to
load.
Patching like it’s 1989
To work out where the FLKey bootloader was failing to load the Launchkey
firmware, the patched Launchkey firmware was once again loaded onto the FLKey
using amidi. After this had finished loading, and the FLKey had rebooted into
a non-working state, gdb was connected to the FLKey’s STM32 using the GDB
server exposed by OpenOCD.
After connecting gdb to the FLKey’s STM32 while it was in this “unresponsive”
state, the current address of the program counter could be interrogated to
understand where in the firmware it was getting stuck - in this case, at
0x8001ecc. Jumping to this address inside of Binary Ninja, it was quickly
apparent this was an intentional infinite loop.
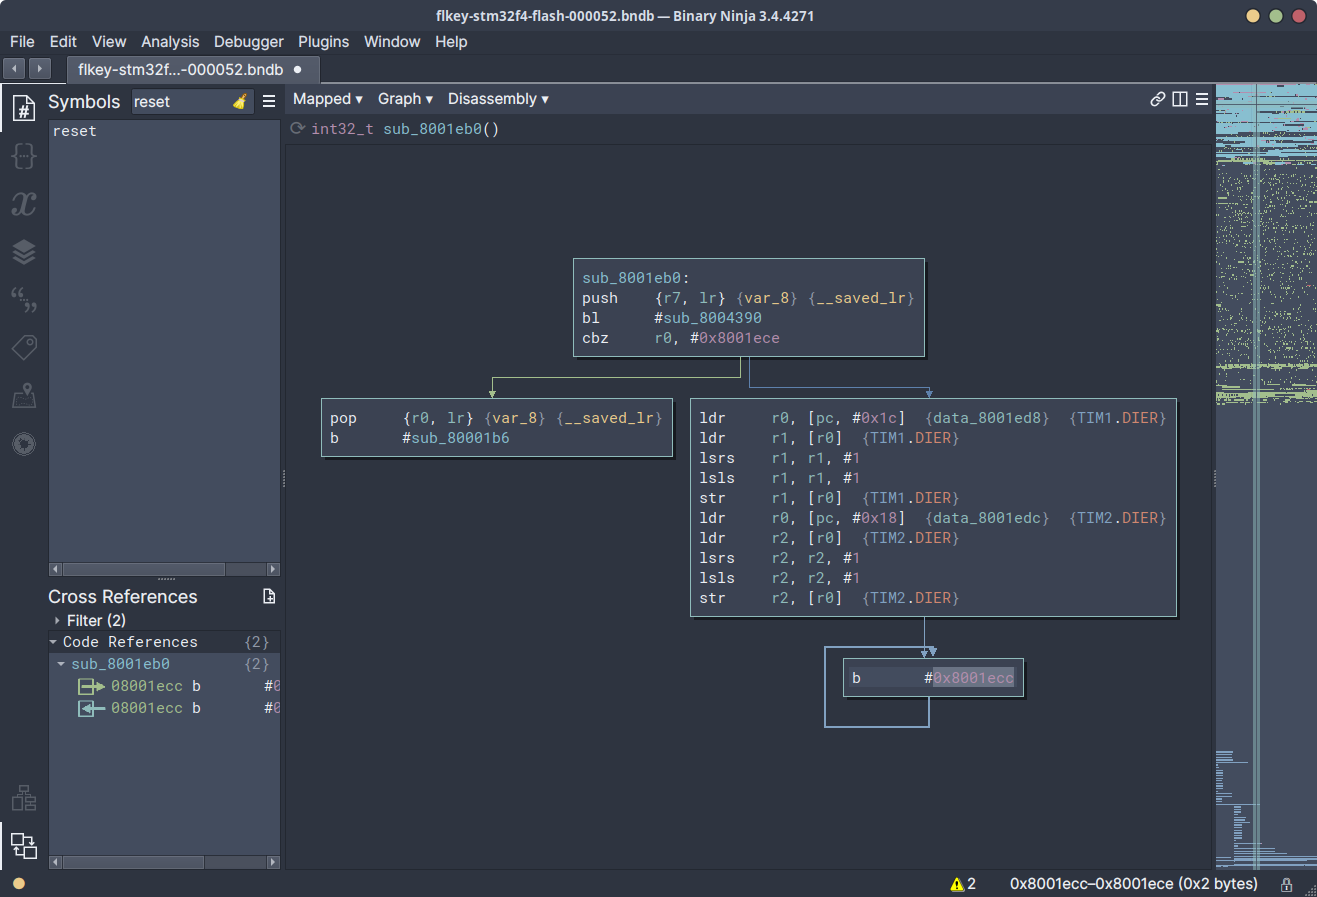
At this point, it was unclear whether this was due to some boot process encountering an unrecoverable error due to subtle difference in hardware, or whether this was some sort of intentional “you bought an FLKey, you get an FLKey” scheme. To understand which of these was the case, the code just prior to this infinite loop needed to be analysed.
The overall structure of the function which contained the infinite loop
(0x8001eb0) indicated that a function at 0x8004390 was called, and if the
result from this function was not zero, then the branch with the infinite
loop should be taken. If the result from this function was zero, then the
infinite loop would not be hit. Whatever operations 0x8004390 was performing,
it responsible for controlling whether this infinite loop would be triggered.
Thankfully, this function was small and relatively self-contained. It did not
take long to determine that this function was making two calls to an additional
function which not referenced anywhere else in the firmware (0x8004334). If
either of these calls returned a non-zero status, then the function which
controlled whether the infinite loop would be entered would return 1;
triggering the infinite loop.
Analysing the function at 0x8004334, this appeared to be looping over the
application image which the bootloader was attempting to load and would return
a non-zero status if a passed string appeared anywhere within the image. The
strings passed to these two function calls were yekhcnuaL and 3KM.
Due to the way the looping was implemented in this “string search” function
(0x08004334), the strings would be reversed when looping over the application
image.
As a result of these operations, this function was effectively saying “If the
strings Launchkey or MK3 appear anywhere in the application image
attempting to be booted, then don’t load it. Instead, enter an infinite loop.”
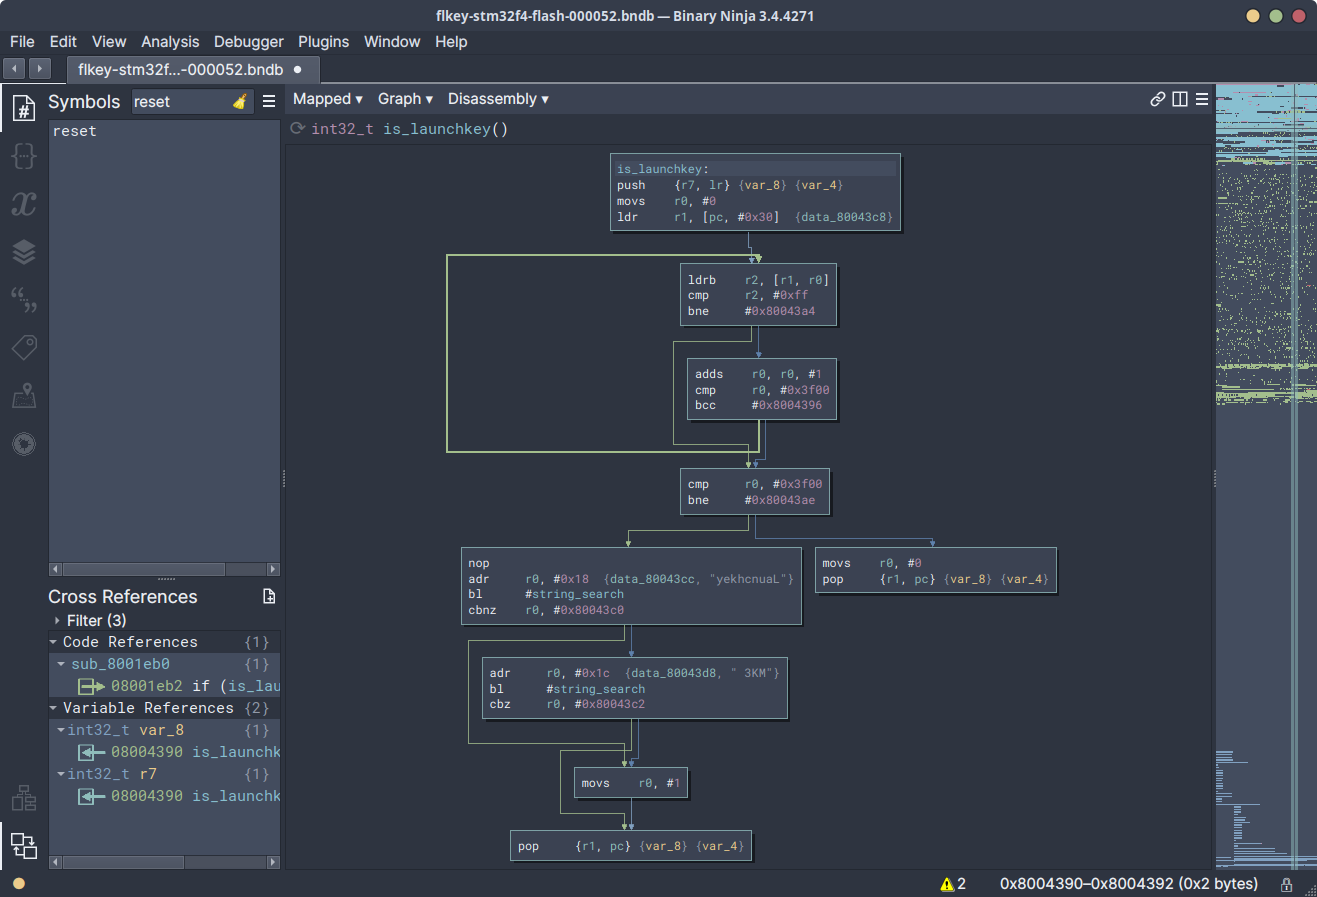
Was this some sort of rights management scheme, or perhaps a feature to protect against damage if the wrong firmware was somehow loaded onto the device? There was only one way to find out: Patch the branch like it’s 1989.
As a debugger was attached to the running device, it was possible install a
breakpoint on return from the is_launchkey (0x8001eb0) function, and patch
the response to always be be 0; preventing the infinite loop branch from being
taken.
After performing this hot-patch and continuing execution, the FLKey started to successfully boot the Launchkey firmware: No magic smoke, no complaints. Neat!
Making it permanent
The next question was how to persist this update. As this was a debugger-applied hot-patch, it was not persistent. To successfully boot the Launchkey firmware, these shenanigans would be required every time the FLKey was powered on – not exactly ideal. However, modification of the application image and the bootloader in flash was not easily achievable directly using the debugger.
As a result, the best pathway forward was to continue reversing the bootloader in order to understand how the firmware updates were encoded. If this scheme could be identified, updates would be able to be decoded, modified, and re-encoded. This would allow these checks to be be patched out and the modified firmware to be flashed onto the FLKey using the native update process. Allowing an FLKey to be permanently turned into a Launchkey without ever opening the case.
…but more on that later.
Thanks
Cheers to @SiouxDenim for once again proofreading this post and correcting my terrible grammar.
–
1. At this point I should mention that I absolutely should have seen this coming. However, in my defence: I am a moron.
2. “Complete MIDI 1.0 Detailed Specification (96.1)”.
3. “DS9716 Rev 11” - Page 32 (Figure 12), and page 41 (Table 8).
4. “AN4701 Rev 3” - Page 6.
5. Matthew Alt - “Replicant: A Primer on Fault Injection Attacks”.
6. Fraunhofer AISEC - “Shedding too much Light on a Microcontroller’s Firmware Protection”.
7. ARM DUI 0553B - Page 2-24 (Figure 2-2).
8. Binary Ninja SVD Loader.